
Page 9 - RoboCilindri, Controller, robocilindri, sinta,
P. 9
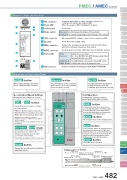
Names of Parts and FunctionsPMEC / AMEC Controller Connects with a PLC or other external controllers tocommunicate inputs and outputs (I/O).When the power is ON, it illuminates in green.See belowRelease Used to release the brake of the actuatorSlider TypeMiniStandardControllers IntegratedRod TypeMiniStandardControllers IntegratedTable/Arm /Flat TypeMini StandardGripper/ Rotary TypeLinear Motor TypeCleanroom TypeSplash-ProofControllersPMEC /AMECPSEP /ASEPROBO NETERC2 PCON ACON SCON PSEL ASEL SSEL XSELPulse MotorServo Motor (24V)Servo Motor (230V)Linear MotorCompleteWhen using MEC PC software, connect to the computer via USB.Insert the power supply cable.Connect the emergency stop button. Short-circuit it if youwill not be using an emergency stop button.Insert the motor / encoder cable that connects with the actuator.NormalReleaseR U N (Green)ALM (Red) E M G ( R e d )Indicates the servo status.On = Servo ON, Off=Servo OFF (Energy-saving) status Flashing (1Hz)=Auto servo OFFThe LED illuminates if an alarm is turned ON or if the controller has come to an emergency stop.HOMEAccel & Speed SettingFWD POSAccelTest run ManualFWDBACKMiddleSAVEBACK POSSpeedContinuousRUN STOPBrakePowerManual AutoGreen :Normal Red: AlarmExt. StartTeaching PortPIO connector Power LED Control panel Brake switchUSB connector AC inletEMG connectorM/PG connector Status LEDSIO ConnectorN o r m a lThe controller automatically controls the brake of the actuatorExplanation of the Control PanelHOME buttonWhen starting, homing is performedfirst to confirm the 0mm coordinate.Acceleration/Speed SettingsConfigure the actuator's motion.Manual buttonPress this button to set the accelerationand/or speed, or to run a test operation. (Press for at least 1 second)AUTO buttonPress this button when operating fromthe MEC PC software or the PLC commands. (Press for at least 1 second)Test OperationConfirm the saved motion by physically running the actuator.FWD buttonIn a 2-position travel, the actuator movesfrom the BACK position to the FWD position. In a 3-position travel, the actuator moves from the BACK position to the intermediate position, then to the FWD position.BACK buttonThe actuator returns to the starting position.RUN buttonIn a 2-position travel, the actuator moves back and forth between the FWD and BACK positions. In a 3-position travel, the actuator repeats its movement from the BACK position, intermediate position, FWD position, then BACK position.STOP button Stops the above operation.FWD BACK POS POSbuttonManualPowerAutoGreen :Normal Red: AlarmExt. StartSwitch the motion you want to configure (see types below).FWD POS: Motion toward the end position BACK POS: Motion toward the home position Middle: Motion toward an intermediate position(Enabled from the MEC PC software. simultaneously press "FWD POS" and "BACK POS" to switch.During a 2-position stop, simultaneous pressing is disabled.)Acceleration Speed knob By turning the knob, you can change thespeed between 1%~100% of the actuator's maximum speed or rated acceleration / deceleration.* The minimum speed may be less than 1% in some cases.SAVE buttonSaves the speed and acceleration adjusted above.CompleteHOMENormalReleaseAccel & Speed SettingFWD POSAccelMiddleSAVEBACK POSSpeedFWDBACKTest run ManualContinuousRUN STOPBrakeConnects with the teaching pendant (CON-PT-M-ENG).Teaching PortFWD POSNames of movements (Intermediate position)BACK POSExplanation of TermsIntermediate (End position)Actual movementIntermediateBACK(Starting position)FWDPMEC / AMEC 482
